Hey there! Let’s talk about Unreal Engine 5’s Gameplay Ability System, or GAS.
This post will be aimed at developers who might have heard about GAS or want to know whether implementing GAS will be worth the effort.
We will learn what GAS is, learn the basics, multiplayer and the pros-and-cons of the system.
What is the Gameplay Ability System?
The Gameplay Ability System is a flexible framework that allows the creation of abilities, effects and attributes to fully customize your game.
You can for example create a fire spell attack, or apply a status effect to your character, the options are endless.
The Gameplay Ability System is also highly compatible with multiplayer projects because it provides secure and efficient multiplayer support.
The Setup
Before we get started with setting up, I do have to mention something about it.
Implementing GAS takes some effort. It requires hundreds of lines of code, and if you’re doing a multiplayer project, prepare for some extra work.
There is no way to set up GAS in blueprints at the time of writing, unless you buy a third party plugin.
C++ is required to set up GAS.
Where do we start?
In the Unreal Engine editor, you have to enable the ‘Gameplay Abilities’ plugin, if you don’t it doesn’t matter how many lines of code you write, GAS just won’t work.
In the YourProject.build.cs file, you will have to add GameplayAbilities, GameplayTasks and GameplayTags to PublicDependencyModuleNames or PrivateDependencyModuleNames.
It doesn’t really matter if you add them in the Public or Private dependency module names
The Ability System Component:
In either your player character or playerstate C++ class, you have to include ‘AbilitySystemInterface.h’.
Do you want to keep your Ability System relevant and persistent while travelling through levels using seamless travel? Then add the Ability System to your playerstate.
Once you have added the AbilitySystemInterface header file to your includes, you can let your chosen class implement IAbilitySystemInterface.
Example:
class ACustomPlayerState : public APlayerState, public IAbilitySystemInterfaceFurthermore, you have to add the Ability System Component.
UPROPERTY()
TObjectPtr<UAbilitySystemComponent> AbilitySystemComponent;
virtual UAbilitySystemComponent* GetAbilitySystemComponent() const override
{
return AbilitySystemComponent;
}
Why a ‘TObjectPtr<>’, well because those are Unreal Engine’s replacement of raw pointers. They offer better stability in the editor, and they are likely to become the standard for Unreal Engine C++ projects.
In the constructor of the class:
AbilitySystemComponent = CreateDefaultSubobject<UAbilitySystemComponent>("AbilitySystemComponent");In either BeginPlay or PossessedBy
AbilitySystemComponent->InitAbilityActorInfo(this, this);That’s pretty much the basic setup for the Ability System Component.
This can be more complex, for example by granting attributes or abilities whenever ‘InitAbilityActorInfo’ happens. However, that’s not a requirement and GAS will work just fine.
The Attribute Set:
Create a new custom C++ class that will store your attributes.
For example: ACustomAttributeSet.h/.cpp.
In the header file, include ‘AttributeSet.h’ and ‘AbilitySystemComponent.h’
To make your life easier, there are helper macros that will automatically generate Getter and Setter functions for the attributes that will be defined later.
In order to implement those macros, add the following to the top of your Attribute Set header file:
#define CUSTOMPROJECT_ATTRIBUTE_ACCESSORS(ClassName, PropertyName) \
        GAMEPLAYATTRIBUTE_PROPERTY_GETTER(ClassName, PropertyName) \
        GAMEPLAYATTRIBUTE_VALUE_GETTER(PropertyName) \
        GAMEPLAYATTRIBUTE_VALUE_SETTER(PropertyName) \
        GAMEPLAYATTRIBUTE_VALUE_INITTER(PropertyName)
The same way as the Ability System Component, add the Attribute Set to the constructor of either your player character or playerstate.
AttributeSet = CreateDefaultSubobject<UCustomAttributeSet>("AttributeSet");
Once that is set up, you can create your very first attribute like this:
UPROPERTY()
    FGameplayAttributeData Health;
    CUSTOMPROJECT_ATTRIBUTE_ACCESSORS(UCustomAttributeSet, Health);
Be aware that attributes will always be float values.
At the moment, there’s no way to make them integer values, so if you desire an integer value, make sure that the values never becomes something with a decimal.
There’s also something called ‘meta’ attributes.
These attributes are a temporary value meant to interact with other attributes.
The most common meta attribute is ‘damage’. Since damage will interact with attributes like health and armor.
Gameplay Effects
In order to apply changes to Attributes, we make use of Gameplay Effects classes.
A Gameplay effect allows you to modify one or more attribute values.
Gameplay effects can be either instant, with a duration or infinite.
The differences of those options are as follows:
Instant: Immediate execution of the effect, mostly used for permanent changes to attributes.
Has Duration: Effect will stay active until the duration period has ended.
Infinite: Effect will stay active until manually removed.
In order to create a Gameplay Effect in Unreal Engine, create a new blueprint -> go to all classes -> ‘Gameplay Effect’ -> create.
Gameplay Effects are data-only blueprints, so you can ignore the event graph.
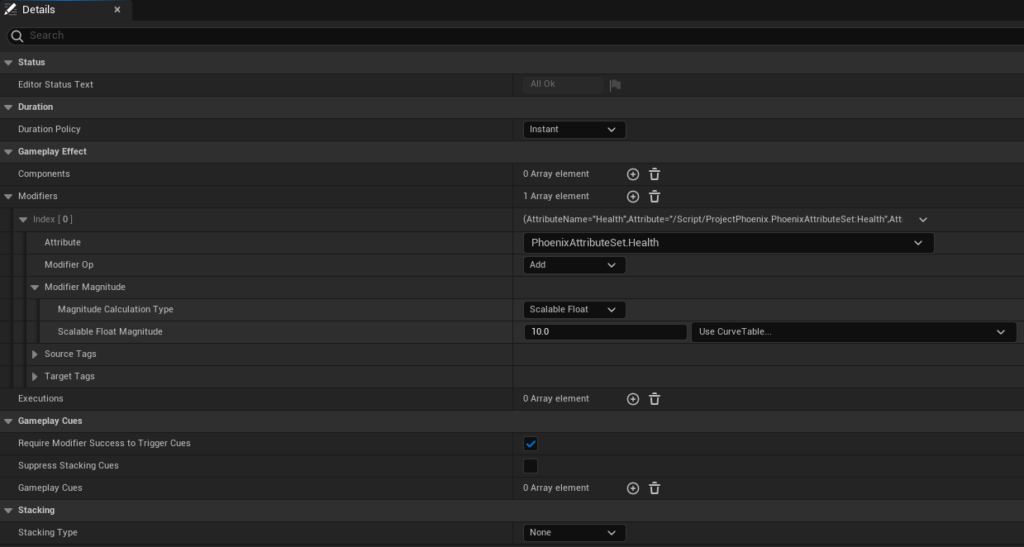
In the picture above, there is a basic Gameplay Effect.
It’s an instant effect that has a modifier attached to it.
The modifier will retrieve the health attribute, and add a value of 10 to it as set up in the modifier magnitude section.
This gameplay effect will increase the player’s health by 10 each time it’s activated.
It’s also possible to instead use an execution class, which allows you to fully customize how the attribute is modified.
This is done using an ExecutionCalculation class.
Gameplay Abilities
Gameplay Abilities are used to implement gameplay actions.
For example: Jumping, Shooting, Casting a fire ball spell, etc.
The Gameplay Ability System uses GameplayTags most of the time, and this is especially the case in Gameplay Abilities.
GameplayTags allow you to easily send and filter data.
For example, you can have gameplay tags for various Player and Enemy actions:
– Player.Attack
– Enemy.Attack
– Player.Cast.FireBallSpell
– Player.Cast.PoisonSpell
In order to create a Gameplay Ability in Unreal Engine, create a new blueprint -> go to all classes -> ‘Gameplay Ability’ -> create.
Gameplay Abilities do use event graphs, and you can also make them state driven.
They are highly customizable to fit your needs.
In order to set them up, create the Ability blueprint, navigate to the event graph, write the ability logic, add gameplay tags and execute.
The Gameplay Ability below is a healing ability.
This ability uses the Gameplay Effect we created before as well as Gameplay Tags.
This Gameplay Ability requires the Ability.Heal tag in order to work.
This tag can be applied to the actor whenever it wants to execute the healing ability, and this will automatically active the ability.
Within the ability, apply the healing gameplay effect to the actor and modify its health attribute.

The picture above also shows some GAS specific nodes.
An example: GetAvatarActorFromActorInfo.
This node returns the physical actor that activated the ability.
Once the Ability should finish EndAbility is explicitly called. This is necessary because Abilities are asynchronous.
Abilities can’t tell the game that they are finished by themselves, so EndAbility or CancelAbility have to be manually called.
All Abilities are multiplayer compatible.
GAS offers a lot of replication support out-of-the-box which removes a lot of headaches when developing a multiplayer game.
GAS also offers execution policies within the Class Defaults of a Gameplay Ability.
The policies are as follows:
– Local Predicted: Ability runs on the client. Client predicts that it can execute the ability. (Mostly used)
– Local Only: Ability will only run on the local client or server.
– Server Initiated: Ability is activated by the server but will also run on the client.
– Server Only: Ability will only run on the server.
Usually you will only use the Local Predicted policy, however there might be some specific cases where you want to use any of the other policies.
An example could be that you want to only activate certain events on the server and replicate it to the connected clients, then you would use ‘Server Initiated’.
In order to replicate sound effects or visual effects (particles, overlays, etc) you must use Gameplay Cues.
Gameplay Cues can be created similarly to Gameplay Effects and Abilities.
Gameplay Cues are replicated out-of-the-box and are specifically meant to play sound effects or display particle effects.
For example: Niagara Particle Systems will not replicate to clients whenever they are called from within a Gameplay Ability, however when the Gameplay Ability executes a Gameplay Cue, and that Gameplay Cue spawns the particle system, then the particle system will be replicated to clients.
Pros and Cons
The Gameplay Ability System is a very broad and complex system.
It has some benefits but it will also have some headaches attached to it.
The pros:
– Highly flexible, you can add it to any project and create endless abilities & effects.
– Creating Effects and Abilities is very easy with the tools GAS provides.
– Replicated out-of-the-box making it an ideal solution for multiplayer projects.
– GAS provides great perfomance, it has little impact on frame times, etc.
The cons:
– Not plug-and-play, it requires a lot of code that is specific to each project.
– Multiplayer projects require even more code.
– No real documentation from Epic Games, most documentation is by third-party developers.
– No standardized way of setting it up.
Conclusion
And that about it.
We learned about the basics of the Gameplay Ability System and how powerful it can be for the right projects.
I hope this has been useful to you.